Text Message Archiving Made Simple: How to Save Chats to Gmail for Peace of Mind

Text Message Archiving Made Simple: How to Save Chats to Gmail for Peace of Mind
Read update
- As of September 14, 2020, Google no longer allows this app to access your Gmail account. Fortunately, there is a workaround available in March 2022.)
Quick Links
- What You’ll Need
- Step One: Configure Your Gmail Account for IMAP Access
- Step Two: Install and Configure SMS Backup+
- Step Three (Optional): Turn On Automatic Backups
Backing up your text messages from your Android phone to your Gmail account is so simple, there’s no reason to not back them up and make them search-friendly in the process. Read on to see how you can turn your Gmail account into an SMS vault.
What You’ll Need
It’s easy to lose your text messages. Everything from switching phones to fumble fingers can drop your messages in front of the digital reaper—just last night I managed to accidentally delete a massive SMS thread when I really only intended to delete a single message that refused to send.
Backing up your SMS messages to your Gmail account is so simple, however, there’s no good reason not to do it. For this tutorial you’ll need three things:
- Your Android phone
- A Gmail account
- A free copy of SMS Backup+ from the Google Play Store
UPDATE: 3/15/22
As of September 14, 2020, Google no longer allows this app to access your Gmail account. Fortunately, there is a workaround available in March 2022.)
Got all that? Let’s get started!
Technically, you can dig around the advanced settings of SMS Backup+ to reconfigure it to work with any IMAP-enabled email server. However, since it was designed to work with Gmail and works so well with Gmail’s search, threading, and starring functionality, we’re not going to mess with a good thing.
Step One: Configure Your Gmail Account for IMAP Access
SMS Backup+ requires IMAP access to your Gmail account to function. Let’s take a moment and hop over to the Gmail account we’re planning on using with the application and check the status.
Log in to your Gmail account and navigate to Settings > Forwarding and POP/IMAP . Check “Enable IMAP.” Scroll down and click “Save Changes.”
Proceed to theGoogle Security page and set up two-factor authentication , if you’re not using it already.
The tutorial for two-factor authentication includes instructions for using an authenticator app. It isn’t necessary for this.
Click “App Passwords” and provide your login information.
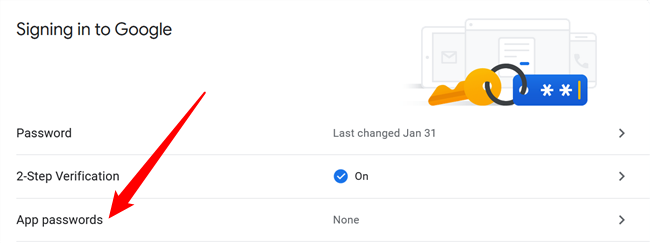
Click the drop-down box named”Select Apps” and set it to “Other (Custom Name).”
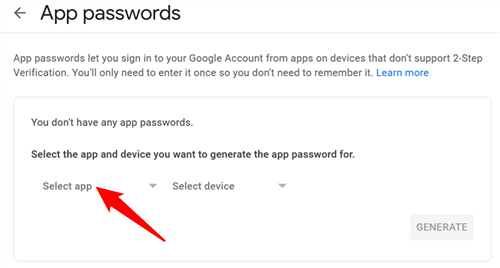
Set the name to something descriptive — like SMS Backup+ — and click “Generate.”
You’ll be provided with a password. Keep the window open, or temporarily save this password somewhere safe. You’ll need it in just a minute.
Step Two: Install and Configure SMS Backup+
With our Gmail account IMAP features toggled on, it’s time to install SMS Backup+. Hit up the Google Play Store and download the app . After the application is installed, it’s time to get configuring. Launch the application.
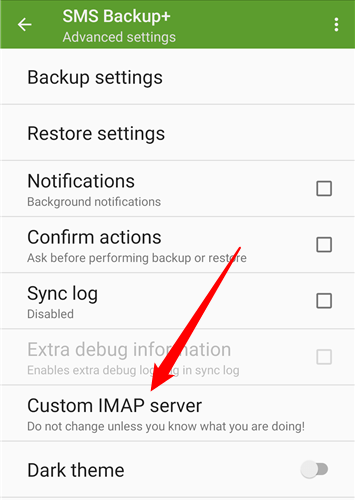
The first step is to set up the connection to your Gmail account. Tap “Advanced Settings.”
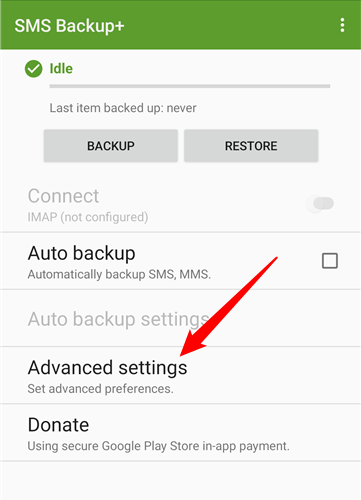
Next, tap “Custom IMAP Server.”
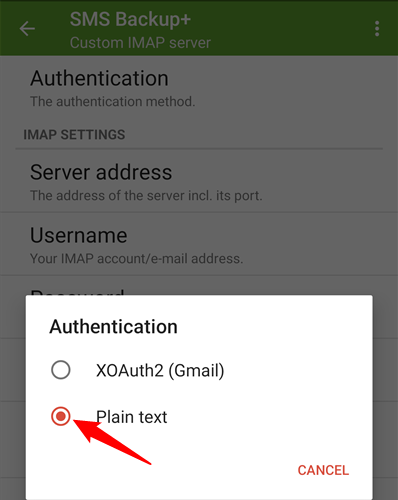
There is a lot to enter here. Tap “Authentication” and change it from “XOAuth2 (Gmail)” to “Plain Text.”
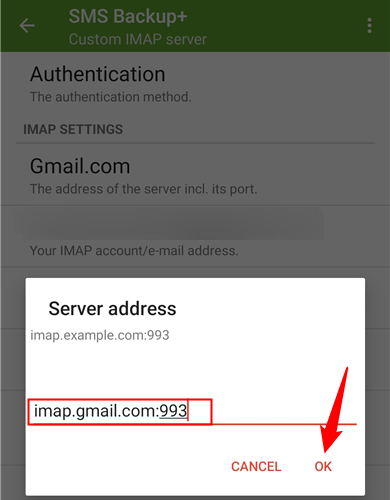
Tap “Server Address,” set the IMAP server address to “imap.gmail.com:933” and click “OK.”
Then go through the rest of the options — enter your email, the password you just generated, and make sure the “Security” is set to TLS. You don’t have to tick “Trust All Certificates,” so leave it unticked.
Go back to the main menu, and click “Backup”. We didn’t come all this way not to back things up!
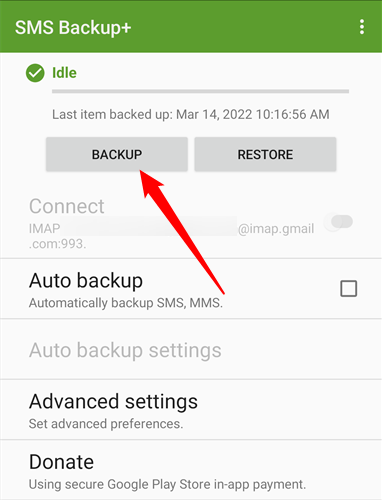
The backup process will start, and depending on how many messages you have, will take anywhere from a minute to a half hour (or longer!) to complete. It chugs along at a few messages per second.
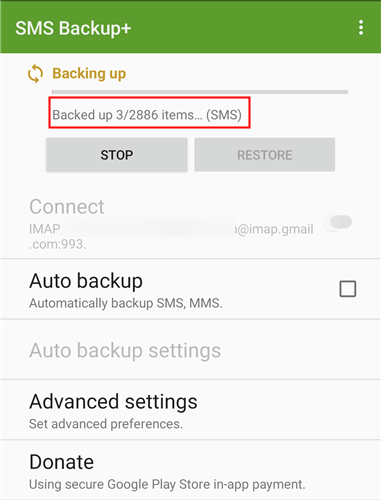
You don’t even have to wait until the process is finished to jump over to the Gmail account and check the progress. Log in to your Gmail account from a web browser. You’ll see a new label in the sidebar: “SMS”. Click on it.
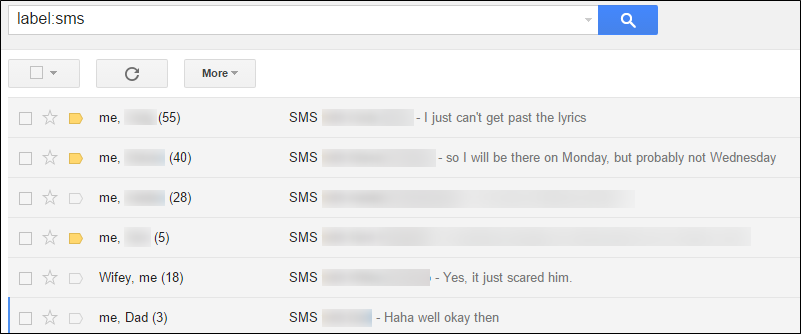
Success! SMS Backup+ automatically backs up your SMS messages as well as your MMS messages. Not only are all of our text messages there but the pictures we’ve sent back and forth are backup up to Gmail along with the messages. Now that we’ve got everything humming along, let’s look at some advanced options.
Step Three (Optional): Turn On Automatic Backups
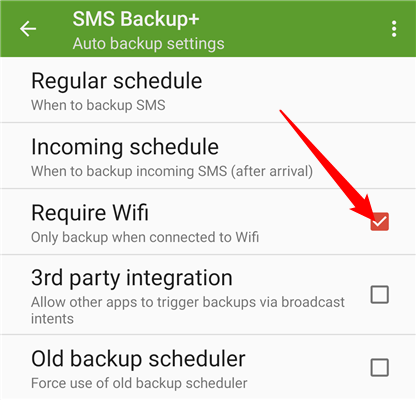
If you do nothing else before leaving this tutorial, you need to turn on the automatic backup feature. Leaving things up to manual backup in a surefire way to forget. From the main screen, tap “Auto backup” to turn it on, and then tap on “Auto backup settings” to configure the frequency. The default configuration is a bit aggressive. You may wish to, as we did, decrease the frequency of backups.

You can even set it to only backup over Wi-Fi. That way, if you’re backing up a lot of MMS, you won’t burn through your mobile data.
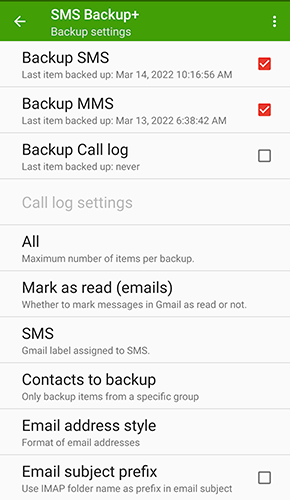
After you’ve set up the automatic backup, return to the main screen and head into Advanced Settings. There, you can change the settings for backing up, restoring, and notifications. Under “Backup”, there are some useful settings you may wish to toggle, including turning off MMS backup (again, to save on data consumption), and creating a whitelist of contacts you want backed up (instead of the default where every single message is backed up).
There isn’t much to look at under the Restore settings, but you can take advantage of a handy Gmail-centric trick. When SMS Backup+ stores your messages in Gmail it creates a thread for each contact. You can tell SMS Backup+ to only restore the contacts with starred threads which allows you to quickly select which conversations are important enough to restore via the star system in Gmail.
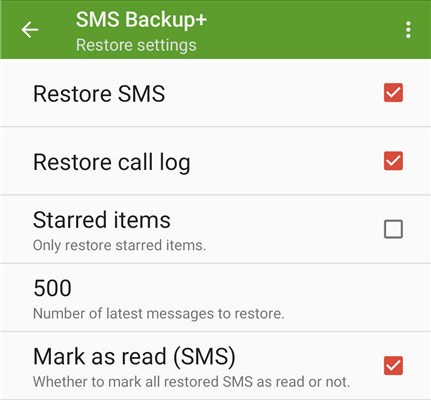
There you have it! All your text messages (including multimedia attachments) are backed up within Gmail where you can easily search them and restore them to your handset should the need arise.
If you’re backing up to prepare for a move to another phone, learn how to transfer messages from Android to iPhone or learn how to retrieve deleted texts on Android .
Also read:
- [New] Origami Inspired Best Minimalist Homes in Minecraft
- [Updated] From Idea to Execution Making Memorable FB Videos
- [Updated] Speak Out Altering Soundtracks in PS4/PS5 Games
- [Updated] The Top Picks Excellent FB Lite Video Downloaders of 2023
- 2024 Approved Inside the Evolved Sony BDP-S6700 World
- Get $200 Back on Apple's Latest M3 MacBook Pro with the Amazonspring Deal - Exclusive Insights
- In 2024, How To Facetime with Your Android Phone ?
- In 2024, How To Use Special Features - Virtual Location On Lava Blaze 2? | Dr.fone
- In 2024, The Palette of Airborne Mechanics
- Revolutionary Updates: How the Latest Final Cut Pro for iPad Transforms Filmmaking Experience - Insights From ZDNet
- Top 100 Walmart's Holiday Bargains: Your Ultimate Shopping Guide | TechSpot
- Top-Rated 2024 Webcams Optimized for Live Streaming - In-Depth Analysis by Tech Experts | ZDNet
- Understanding Apple's Latest Move: Adding 9 Mac Models to Its 'Obsolete' Roster | Insights From ZDNet
- Unlock Exclusive Best Buy Offer: Claim Your Complimentary MacBook Air M3 – Step-by-Step Guide Revealed by ZDNet
- What's in Store for the Tech Community? Exclusive Preview of Apple Intelligence, Next-Gen iPads, and More at October Event
- Title: Text Message Archiving Made Simple: How to Save Chats to Gmail for Peace of Mind
- Author: Richard
- Created at : 2024-12-17 08:18:22
- Updated at : 2024-12-22 08:33:07
- Link: https://hardware-updates.techidaily.com/text-message-archiving-made-simple-how-to-save-chats-to-gmail-for-peace-of-mind/
- License: This work is licensed under CC BY-NC-SA 4.0.
